

The screens on this page use fixed labels, set by the product: Quotes, Policies, Needs you, Linked accounts and Submissions. They are quoted here as they appear. A product can change the words of some stages and buttons, so a label on your screen may differ from the default quoted here.
What a linked Space shows
A distributor’s Space is cut down to this work. Records, Linked accounts, Submissions, Chats and Meetings are not shown in it.
On a publisher’s Space, Linked accounts and Submissions appear at the root of the Space. You can hide either one: in Edit space, open General and tick it under Hidden tabs. Quotes and Policies are not on that list. Once the Space’s pages are set up in Pages and actions, turn the page off there instead. See Spaces and Menu and pages.
Start a request from a product
The Quotes tab lists each request with its client, reference, product, Stage and when it was last updated. Use the search box (Search client or reference), the Stage filter and the product filter to narrow the list. Switch between a table and cards with the display switch. If the Space has no products, the tab says This space is granted no products.1
Select the create button
The button at the top right of the Quotes card is named by the product.
2
Choose who it is for
If the product files its requests against a client, a dialog titled Who is this quote for? opens. Search for one and select it, or choose New followed by the Space’s word for a client, or Start without one. The wording follows the contact label as configured for your Space.
3
Fill in the form
The new request opens as a page with the product’s form on the left. A Premium card sits beside it, and a picker for the contact on your side when the product asks for one.
4
Check the price
Select Get a price to see a price for the answers so far. Nothing is submitted. The button stays off until the required answers are in, and while the form is locked.
The price breakdown
When the product can price a request, the Premium card shows the result. A price that comes with lines shows them one by one, in the order the card lists them, and a combined total. A price that needs a closer look shows an alert instead, with its reasons. If your answers change after a price, the card says Answers changed since this price. While the price is being worked out, the card shows Pricing… and updates on its own. If it fails, it shows No price and the reason.Submit
Once the required answers are in, a Submit button appears on the draft’s status card. The Next steps card lists what comes after, and says they are Available once the quote is saved and submitted. A saved request stays a Draft until you submit it.Status and whose move it is
Every request carries a Stage. The stages, in order, with their default words:
A request also shows Unsent changes when your answers have changed since the version the publisher holds. Send them again to get a new answer.
The Needs you list on Home collects what is waiting on you, most pressing first, with the client, the reference and how long ago it moved. Each row has a button that opens the request. It shows Nothing needs you right now. when it is empty, and +N more when the list is cut short.
After a decision
The publisher’s answer is mirrored back onto your request, so you do not enter it twice. On the request page, the Outcome card shows:- The price, under Premium, and the dates it applies to.
- Reason or Reasons when the answer is a referral or a refusal, otherwise Notes.
- Asked by the underwriter, when the publisher has asked for more. Answers to check again are marked. Edit the request, answer them and send it back.
- Terms, and Documents the publisher has shared with you.
The publisher’s Submissions inbox
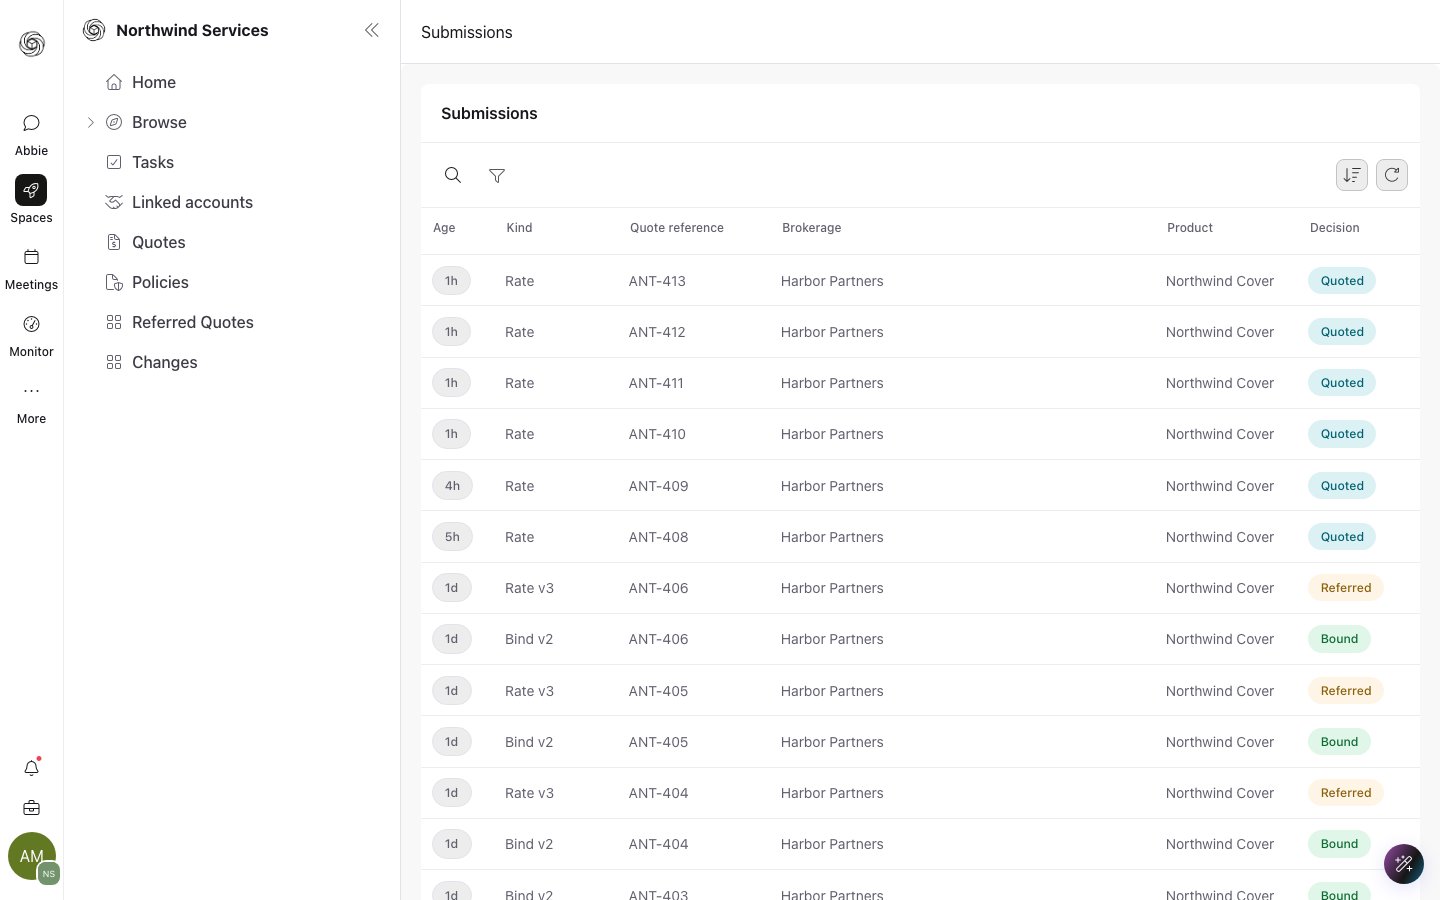
The publisher's Submissions inbox: every request from linked accounts, newest first, with its decision.
1
Open it
Select a row. The Decision area opens with three tabs: Submission (what was sent, with its answers and what changed since the last version), Decision and Activity.
2
Choose what to tell the sender
On the Decision tab, pick an outcome. Which outcomes are offered depends on what was asked: a price for a rate, an acceptance for a bind, an approval for a change or a cancellation.
3
Save or issue
Save draft keeps it to yourself, shown as Draft — not sent. Issue decision sends it, and the sender sees it on their request.
Publisher branding on the invitation page
When you send an invitation, the page the other account opens shows your logo, or your name when there is no logo, with an accent colour rule. Invitation and confirmation links use your published address. Invitations themselves are covered in Service desk.Next steps
Service desk
Link accounts and send invitations
Menu and pages
Hide tabs and order the menu
Spaces
Create and configure a Space